Friday, December 24, 2010

Infographic

View it Fullscreen


    Spur of the moment I decided to beef up a doodle from my sketchbook.  It charts the density vs length of significant instances of facial hair.  You earn like, 1 bonus point if you can identify them all because they're really not that hard.

Happy Holidays.

Happy Holidays...


Happy Holidays!

Happy HO-li-days...

Wednesday, December 15, 2010

Seakings Trident

This one was a comission for my dear old friend Mike. He and I go way back. We ruled marching band with iron fists, and he always had my back. Except when he was busy with other musical ensembles. Or sports. Or AP classes. Or some yucky girl. Damn overachievers.   
  Amongst other things, he's now the percussion instructor at *censored to protect the children!* High, home of the Seakings! So I got asked by his better half to craft a mighty Trident-of-stay-out-of-the-band-section for my old band comrade. Who could resist?


  A general design was loosely sketched, scanned and turned into a nice, precise, symetrical, curvy vector drawing, which was printed out for blueprint/ template duty.  I wanted something dramatic and sweeping, but hopefully didn't venture too far into the dreaded fantasy cutlery category with my shape...

  I had the batshit notion of making this thing out of plywood (WHY?!?)  Allegedly for strength.  Pha.   I glued one copy of the prints to some .5" harwood ply if I remember right, and set to cutting it out on the band saw.  The outside contours were refined, and then taken to my ghetto router table to create some of the bevels.  The more gradual ones were shaped by hand with a surform.  The one useful aspect of the ply was the fact that it's layers allowed me to gauge the contours and keep the form pretty symetrical.  I painted the whole thing down with wood glue to help seal it up and keep the layers together, and then moved on to the joyful process of bondo, sand, repeat.  Periodically interspersing a light primer coat so that I could gauge my progress.

  A groove was cut into the center of the trident blade to accept a threaded rod. I don't remember whether I dedo'ed that, or just dremelled it.  In any case, the rod was placed in, and secured with lavish quantities of epoxy.   The rod travels quite far up the blade in an attempt to enhance structural integrity.  After this, more bondo to cover the groove.  Once I had the whole thing smooth, I plastered it with more bondo!  What?!  I wanted to create a rough texture, 1) b/c it would be interesting, 2) in an attempt at evoking a rough-cast finish.  I figure that this thing is so monstrously thick and nasty that it may be realistic to cast it, then peen out the edges, like a scythe, rather than forging the thing.  

  The shaft was the handle for a hoe from the hardware store.  (Wow, that whole sentence could be taken as a euphemism...)  It came complete with plenty of scratches and machine marks, and an ugly epoxy coating, and so of course I took some sand paper to it.  Once the old finish was gone, it received about 4 coats of black polyurethane, giving it a lustrous, laquer-like finish.  It looks really purdy.   I purposely dragged the brush thru coat 2 or 3 once it had started to get a little tacky to create some texture similar to that on the blade.  The subsequent, properly applied coats of polyurethane knocked the texture back to a very subtle, but still visible level, and left it with a nice, smooth finish.

  The Handle came with a hole in the end to accept a gardening implement's tang, which was far wider than the threaded rod I embedded in the trident head.   I bored the bottom of the hole deeper with a bit that would just accept the rod, and then fitted a threaded insert nut to the top of the hole with some epoxy for extra insurance.

  The trident head next got a good, thick coat of satin black, and then one of chrome gold.  I masked off the edges of the blades, and then gave it a light coat of a matte paprika red. (A favorite flavor and color of mine!)  And on top of this, a very light dusing of gold to give the red a little iridescence.  

  Unfortunately for me, this gold layer turned out to be heavier than I thought it was out in the glaring sun, so I briskly wiped the raised surfaces with an acetone rag to pull most of it back off.  This was quite harrowing, but I managed to keep from removing any paint I didn't want to remove.  The edges of the red were also weathered with acetone.  Acrylic paint in green, brown, and black were applied to the recesses and crevices to add a little more wear, and to suggest patination.  Next up was a satin clear coat to protect the piece.

  Finally, the trident head could be threaded on to shaft (which took a long damn time;  it's a long threaded rod!)  The cutout in the bottom of the blade fit the shaft's ferrule quite nicely, bracing firmly and making for a very secure piece.  No real need to glue or locktight it in.


And there you go.


Check out a few more pix on my flickr

Tuesday, December 7, 2010

Ojai Post Office Christmas Ornament

  My dear friends the Leivos purchased, and have been breathing new life into the  Ojai Village Pharmacy, located -surprisingly enough- in Ojai.  They asked me to create some unique Christmas Ornaments for the store this season, so of course I couldn't resist coming up with a suitably involved solution.  Their drug store is right across the street from the Ojai Post Office, the tower of which is a visually striking historical landmark for the town.


   These ornaments started life as a very careful vector drawing done in Illustrator.  Typically in my process, these would be printed out to use as templates and blueprints, but I've had the good fortune of getting involved at the Industry Showroom in downtown SanDiego, specifically doing laser etching at Atomic Laser Lab.  I was excited to put the machine thru its paces, so I decided to test it out with this project.

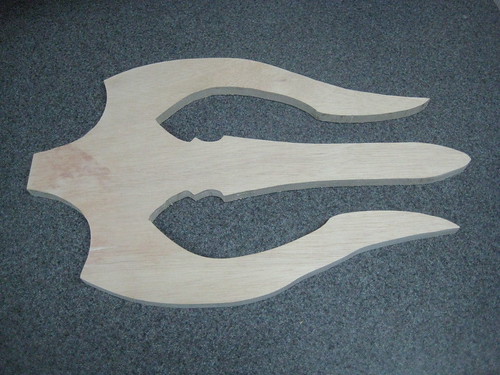
   From the drawing, I created a series of topographical slices, to be cut and later stacked up again to create a dimensional model.  These were output as EPS files, and then imported into Correl Draw (the Epilog Laser's preferred graphics program) and cut out two different materials by the machine.   The body of the piece is made from two slices of 1/8th" acrylic sheet, with details etched maybe 1/16th" into the acrylic.  I then cut out a whole mess of parts from heavy cardstock to form fine details such as the trim.

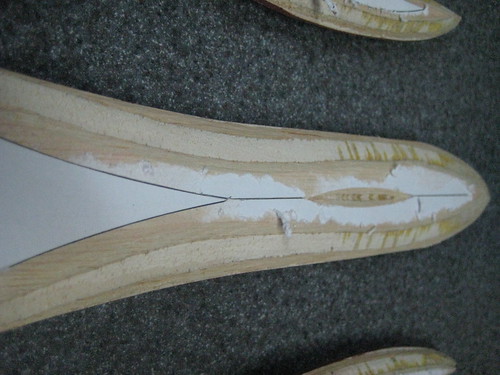
  The dome was cut separate from the rest of that layer, and shaped to a contour with files and sandpaper.  Next, the pieces were glued together with CA glue aka superglue. I made sure to saturate the paper well to bond it.  This had the side effect of adding some texture to the paper portions, which I knocked back to desirable levels with fine sandpaper.


  Next up, a primer coat of Rustoleum double cover primer, in what Krylon would call ruddy brown.  Then, a coat of Rustoleum Multicolor textured finish.  It gives sort of a sandstone look, which I wanted to hold detail and emulate a plaster or stucco finish.  That was sanded lightly with fine sandpaper to remove high points, and then sealed with a final primer coat.

  I reproduced the piece using Smooth On's excellent products.  Specifically their pourable silicone starter kit, since I could pick it up at Blick's with a 40% coupon, and the included smoothcast 300 resin and Oomoo silicone were appropriate for the application.   

  I didn't take pictures of the mold-making process because my hands were dirty, and because Smooth-On provides excellent instructional materials on their website.  The primered piece was hot glued down to a disposable plastic tray, and a wall was then built around it using cut up paper plates and hot glue.  The piece was sealed with Superseal, Then dusted with a bit of Ease Release.  (Which probably wasn't essential, but I didn't want to risk it.)  Next, silicone is mixed up from two parts, and carefully poured over the piece.   The Oomoo silicone does a good job of removing its own bubbles overall, but the fine grids I created in the window recesses are bubble magnets, and I really should have brushed silicone into them to eliminate their formation.  Alas I didn't, which meant cleaning up the bubbles that formed on each casting.

  After letting the silicone cure overnight, it was a snap to demold the original, clean it out, and make my first casting.  Learning from my mistakes:  When I hot glued down the original model, I didn't put the bead out to the edges of the piece, which caused the silicone to flow under the edges, creating a lip to the back of the mold.  It was thin enough that it didn't damage the mold or fully mechanically lock the mold down, but it could have, and it did reduce the quality of the edges of the mold, necessitating cleanup on all of the subsequent castings. Always pays to take your time on the front end of the process.

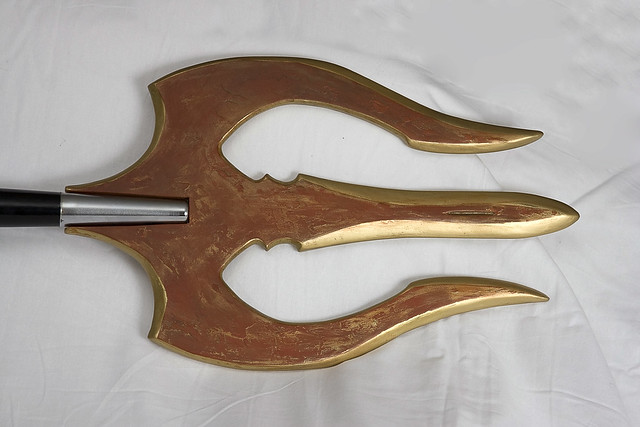
This one was coldcast bronze;  the plain resin comes out white.

The Smooth-Cast300 resin is a breeze to mix up, cures in about 10 minutes, and holds impeccable detail.  It's fairly strong and quite light, so the ornaments will be able to hang easily on the tree despite being somewhat large.  Pieces are still flexible at ten though, so 20 minutes is a more advisable demolding time.  The painted versions of the ornament were cast in the raw white resin, but I also created some in cold cast bronze by mixing powdered bronze dust in with the resin.  A tutorial on cold casting is available here.  In short, the exterior of the piece is a layer of equal parts resin and metal.  This makes for a lovely metal finish, but is structurally weaker, and so underneath the metal-resin exterior is a core of plain resin.

  The Cold cast pieces are completely painted with a deep burnt umber acrylic paint, and then rubbed down with a rag soaked in acetone.  This removes all of the brown, except for recessed areas, creating an antiqued look.  It also softens and wipes away resin from the surface of the piece, exposing more of the bronze powder, and making for a more metal-like finish.
Dark to light painting process.

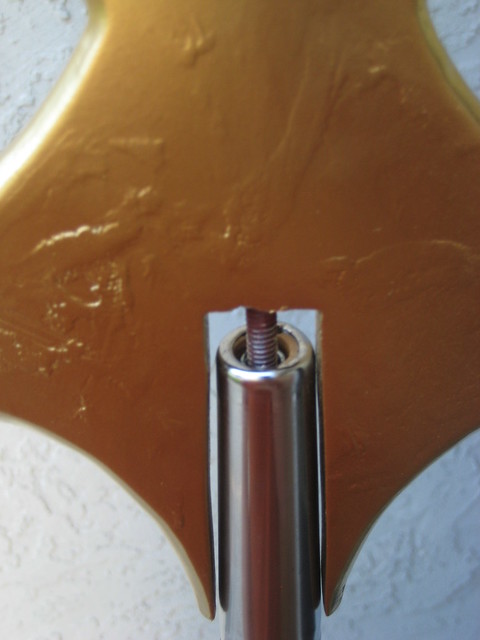
  The pieces that were cast in plain resin received a primer coat, and are then treated to a series of dry-brushed paint coats.  Since I was extremely literal (pretty painstaking, really) on matching the shape of the real tower, I took a little bit of creative licence in the finish, trying to achieve something textural, rustic, and interesting when I painted the ornaments. They were first thoroughly painted in the same dark brown as the bronze pieces, to create the darkest recesses and shadows.  Next a coat of burnt sienna brushed everywhere, but into the deeper crevices, and so on, getting progressively lighter in shade, and using a progressively drier brush.  Once I've gotten to my lightest color, an off-white,  I glazed the trim with burnt sienna, and the decorative tiles with blue and gold.  Finally, an acrylic clear coat was applied to protect the paint. A hole is drilled in the top of the dome, and a brass eyelet fitted to hold the ornament's hanger, and to echo the weathervane on the genuine article. A lasercut tag and some hemp twine to hang it, and the ornament's all done.


Check out a few more pics on my flickr.

Wednesday, December 1, 2010

Coffin

My friend Rachel is kicking names and taking asses up in Chapman's graduate film program in directing.  She had the stupendous I idea of doing a spaghetti western for a film, and needed a very special coffin, crafted to suit the needs of a jaded protagonist's ironic sense of justice.  So of course I got a call.  It may have actually been a facebook message, but that sounds far more uncool and far less Hollywood.

Stipulations were tough-  had to be light enough for once person to drag, had to be tough enough to be actor proof (which is pretty damn tough ftr,) had to be cheap.  

I started with the plans here:  <a href="http://scarefx.com/project_coffin_2.html" rel="nofollow">scarefx.com/project_coffin_2.html</a>
But the dimensions weren't gonna serve my purposes.  I moved the sideboards outside of the baseboards to milk maximum height out of the box, and added another row of sideboards to fit a living human in.  Whipped out google sketchup rather than illustrator to make my plans this time.  Really came in handy for getting measurements of sides, angles, and for projecting the look of the final piece.  Definitely worth the little bit of time it took to model.

Then i felt the need I to make a real-world mockup to satisfy myself that the computer plans weren't lying to me.  
Me: (from across house)  "Dad!  I need your corpse!"
Dad:  "Excuse me?"
*whips out collapsible cardboard coffin*
Dad:  "Awesome!"

I took the time to make up these lovely cut plans to economize wood in the spirit of the scarefx tutorial, but I have no idea if I adhered to them.  Once I got the floorboards cut, I launched into the traditional building frenzy of my people.

The floorboards were cut out, and then I set to creating A frame to hold the floor together.  Horizontal braces were placed to run where the arch of the back and back of the knees are located, keeping our talent's rump and shoulderblades comfy and content.  Each segment of the side wall was framed as a modular panel in a similar way, and then screwed onto the sides of the base.  In the scarefx tutorial, they were placed on top of the base, but  I needed every inch of height I could get.   Only weak point was toe screwing the "shoulder" angles at the top. Those were only 16 degrees if I remember, and may have been better to have a single plank bridging the angle, rather than being attached to one another.

Tada! You can also see where I got stabbed by a rusty staple! Tetanus shot, don't fail me now.

Cedar turned out to be the cheapest fence pickets (and thus the cheapest option for wood) at the Home Despot.  This gave it acceptable rigidity, the best lightness I could hope for, and made it smell INCREDIBLE!

"I screwed the $#*^ out of this &!*@#!"

Yeas, I would've prefered a nail gun or staple gun, but barring those, deck screws seemed like my best option

I applied a power drill wire brush to the cedar planks to bring out the wood pattern, giving the coffin the appearance of age and wear, plus more texture for the camera to read.  The bottom 1/3rd hasn't been brushed here, and the difference is pretty stark.

Annother shot of the texturing,with the drill in question in frame. If you're interested in reproducing this effect, here's the only thing that worked for me after much trial and error:

The drill was pointed in the same direction as the grain, and the drill's shaft was nearly parallel to the surface of the wood.  I was using a cup brush, so the bristles were also pointed in the same direction as the grain.  I then Moved the drill back and forth perpendicular to the grain.

Everything else I tried just ate up all of the wood, because the cedar's way soft.   But using this technique, you'll pull away the softer parts of the grain, leaving behind the hard bits, and thus achieving wood texture instead of wirebrushed texture.


Seriously, most beautiful inside of a coffin evar. 

The script called for two different characters to rest their weary behinds on the closed sarcophagus, and after a test sit, I determined that it needed reinforcement.  The reinforcing frame sits inside the edge of the walls of the coffin, keeping the lid in place.

The bottom.  Big old 2.5" deck screws going up into the vertical struts. 

I sheer formed off the overhang of the sidewalls to make the bottom flush, and help the thing drag along the ground as smoothly as possible.

I stained spots that I wanted extra dark-  knots and creases and whatnot.  After this dried, the whole thing got a full coat of stain.  I did NOT mix the stain, and so only used the thinner top part of it, which is a big part of what gives the end coffin a weathered, old appearance.

I beat the coffin with chains and tools (careful to make the marks random, and to NOT structurally damage the thing.)

Minwax wood finish in special walnut was then applied.  I did NOT shake or stir the stain first.  This caused the color to be more desaturated, and the stain to be far more transparent, achieving the aged look I desired.  You have to stop when you get close to the bottom of the can, or you'll start scooping up the concentrated, viscous, opaque matter that you've concentrated in the bottom of the can.

looks a little redder here than it did in person, thanks to magic wb settings.

All done, and ready to ship (read: for me to drive it) up to LA!

Outright Fabrication

    I don't have the typical miniature devil and angel versions of myself standing on my shoulders, complicating my decision-making process.  Instead, my inner dialogue is shared with just one bite-sized doppelganger.  He seems to be my alter-ego as a jaded, accusatory old professor or something.  I can always count on him point out that I don't really know what I'm doing, but sometimes working intuitively is how I work best.

Me: "...Sure, I can do that."

Him: "Why, that's an outright fabrication!  You've never done this before!"

Me: "But it's sure coming along nicely, isn't it?"

Him: "Blast you."

   This blog is intended to serve as a repository of my creative process.  And really, the process is my favorite part;  it's the act of creating itself that really captivates me.  Fabrication may be a bit of a stretch for the types of art, prop, etc. that I make.  However, I'd like to change that fact, and in any event there's a real dearth of available blogger urls, so it'll due.  

cheers